Sunday, December 15, 2013

NewTek LightWave 1.6 now on RenderFarm.NL

From today RenderFarm.NL also supports NewTek's LightWave version 1.6. So If you use this 3D application and you need affordable render capacity for your 3D animations you can contact me on michel@renderfarm.nl. I also did some minor updates on the RenderFarm.nl website that you can find on http://www.renderfarm.nl

Wednesday, December 4, 2013

First Useful 3D print

Today I finished my first usefull 3D print. The machine you see on the left is our coffee machine. Once in a while it needs cleaning and then there is water coming from the two nozzles left and right. Since there is not much space and it is quite a lot of water coming out of it, my wife usually has to pay attention since she has to empty the stuff she used to put under there half way. But it always is a bit messy. So we came up with the idea to make custom made compartments to hold the water.

As you can see in the picture on the right this is quite a large object already for the printer. It also took about 20 hours to print each of them. I designed the whole thing in Cinema 4D by the way and then exported to STL format. It is really nice to be able to make something like this just from software I already know :) Yesterday we did the first cleaning cycle with them and it worked out really fine. So another project finished.

It might look easy by the way, but I can assure you that this project took a lot of time. I also had a misprint where the PLA on the role got tangled :( So after 15 hours of printing or so, I could start all over again. So far every time I walk away from a print, something goes wrong. So I now plan my prints when I'm at home the whole day. So yes... 3D printing is nice. But it is time consuming and you need to know what you are doing. I'm really looking in to a more professional printer now, to hopefully get better quality and less hassle. I'll keep you posted :)

Wednesday, November 27, 2013

New Synths in the Studio

After a very long time of buying completely nothing, suddenly I saw a synthesizer that has been on my wish list for the collection from day one. Never before I found one for sale in a condition like this one. It is an EMS 'Putney' VCS3. It is quite a rare synthesizer that was made in 1969. That is also the year that I was born, so that makes it extra special for me. It is a modular synthesizer that became famous famous because of its unique joystick, envelope fire button and the patch matrix. The matrix works with little pins and is actually quite convenient compared to plugging in patch cables to modules.


The machine is really in a great state, everything works and I'm so proud :) There is actually one in the London science museum you know :) That was the last time I saw one. The EMS's are actually perfect for creating sound effects and that is what Jean-Michel Jarre has used it for a lot. He made EMS famous together with Pink Floyd I guess who made there famous 'on the run' sequence on it. Well on the right is a nice pictures of the other machine I love for sound effects the ARP 2600.

And here is another syntesizer that I added to the collection. It is a Sequential Circuits Pro One. It is of the same make as the famous Prophet 5. This one is monophonic though. It is supposed to be great for bass sounds. To be honest I never played on one before, so this is new territory for me as well. A very nice feature is that it also has a sequencer on board. I can't wait to play around with it, but first I have to have a go at the VCS3 :)

Sunday, November 24, 2013

Another 3D Print - Star Wars Tie Fighter

Last week suddenly I heard a noise and I saw the extruder of the 3D printer I build hanging on only one screw. I tried to fasten everything again, but I had no luck what so ever. So before I could do any more printing I had to take the whole extruder apart, fasten the screws a but more and put it back together. That was a little setback, but unfortunately it didn't end there. After that I had to recalibrate the head distance and I had no luck in that.

The material just didn't want to stick to the heated print bed anymore. I tried cleaning with alcohol, rubbing it a bit with sand paper like I did before, but no luck. Then I started looking on some forums for a solution and I found one. Painters tape! Very cheap stuff that you can just stick on the print bed and after that I printed like a charm. I guess by now you would have guessed from seeing the pictures of a print in progress.

The model I printed came from ThingiVerse and it is a tie fighter from Star Wars. I really like the look of that model. It consisted of three separate printable parts that you eventually have to glue together. But before I got to this point there was some more trouble. After the first print was finished, the material was stuck to the painters tape so well, that I couldn't get it off. I printed in PLA and that is quite fragile, so I could not use too much force since then the material would break.

So again I went to look for a solution and I found one. The tip was to use a spraycan with compressed air, put it up side down on purpose so that the stuff coming out is frozen. This cools the object to quickly that it shrinks a bit and pops loose. And guess what? It worked :) I will go and look now though for blue painters tape since they say this is less sticky. So that is worth the experiment. All in all the model is done and I really like it. But again I found out that printing on a DIY 3D printer is not so easy as it looks. Ah well most important thing. It still works. Up to the next project.

VrayForC4D update on RenderFarm.NL

Last week I upgraded all the VrayForC4D installations on the render farm to version 1.8.1. This version is quite a major upgrade and is now based on the Vray 2.45 kernel. I am running this on C4D R13, R14 and R15 now on the farm.

If you are interested in running a job on my render farm then do contact me on michel@renderfarm.nl

New Website for Biz2Be

I showed you the Biz2Be 3D logo and 3D under construction page before, but now the website is finished. The customer selected the 3 pictures and I made the header graphic in Cinema 4D. I think the graphs complement the logo and general theme of the company. I made the rest of the website in Joomla 2.5 for the customer so that he can update the content himself. The website is hosted on a shared Joomla webserver at Virtiso. You can visit the website if you like at http://www.biz2be.nl. The customer did call me last week that he had a spontaneous potential customer already. Always nice to hear :)

Friday, November 15, 2013

First 3D Printer Output

Last time I promised to show you the first thing I outputted on the Velleman K8200 3D Printer. Well here it is. It is actually kind of a puzzle that you have to put together. It was originally designed for laser cutters to be made of wood or metal, but someone transformed this into an STL and put it on ThingiVerse. This site is filled up with nice projects, but I decided this would be a nice first test. So here is a picture with all the finished parts.

And this is what it looks like when you put it all together. It is actually a Tyrannosaurus Rex model. I think it looks quite neat. I printed it in transparent PLA and in thick layers that turns out to be a bit white. It is made with 50% infill and the nice thing is when there is light on it you can see the honeycomb structure inside. I think it is quite cool. Well this was the first print as I promised. A very decorative and non functional make :)

And here is another picture of it. I probably should have taken it from the other side, but I didn't think of that ;)

I did print a lot of other stuff in the mean time, but nothing is quite finished yet. I'm still very busy with other stuff and don't get to printing too much unfortunately.

I will try to update you all soon on that, but first things first. Work is taking up a lot of time at the moment.


Sunday, November 10, 2013

Autodesk 3D Studio Max now on RenderFarm.NL

I'm happy to announce that now also Autodesk 3D Studio Max is installed on the Render Farm. We installed versions 2014, 2013 and 2012. We also did an initial test with a customer, but unfortunately we are seeing some problems with path references. My own knowledge lies with Cinema 4D so we are looking for a solution at the moment. If you have experience with 3D Studio Max and Render Farms and can help us out, do let me know. I will give some premium time on the Render Farm in return. We also added some new servers. We have 114 dedicated CPU cores at your service and the Render Farm scores 18.360 Cinebench R15 points at the moment. We also just updated Blender to version 2.69. You can contact me on michel@renderfarm.nl if you are interested in rendering on the farm or have experience with 3D Studio Max and Render Farms.

Velleman K8200 3D Printer (Part 6)

I know it has been a while since I wrote on here and that some of you are waiting on the final part of this series about the Velleman K8200 kit. I have been very busy lately with my new company Virtiso BV and didn't have much time for anything actually. But today finally I found some time to catch up on here. First of all here is a picture of the finished printer doing its first test prints. As I wrote before though this didn't go as I planned.

On the picture on the right you can see what happened on my first test prints. I was quite puzzled and had no idea what to do next, since the manual ended here. I started reading a bit on several forums and started asking around. The first thing I learned (and it is in the manual now) that you really need to roughen up the print bed a bit with some sand paper. It is just to smooth as it comes. Secondly you really need to clean it with some alcohol. This has to be 70% the least, but more is better. This is because when you touch it with your fingers it will become greasy.


And then I think the hardest part was calibrating the print head Z distance. The head needs to be exactly 0,25 mm from the bed. And in every direction. So you need first to level the print bed with the screws below and then you need to turn a screw that touches a microswitch to calibrate it. I tried to do that on eyesight, but that really is impossible. You need a tool like you see in the picture on the left. I don't know what it is called in English though but it consists of small metalic blades that you can use to 'feel' the distance of the head to the bed. When you can put the 0.2 5mm blade just in between and you feel some friction it is OK. Then don't forget to securely fasten the calibration screw since it will come loose from vibration.

And then you need to calibrate the software settings as well depending on your material and print object. It took me about as long to calibrate the printer as it took me to build it. So do keep this in mind. Printing in 3D is not as easy as it looks at first sight. It takes time, skill and a lot of patience :) Then I had another problem that turned out to be the USB driver on windows. I finally swapped to a RaspBerry Pi running Octoprint and in the picture on the right is the first part that was finally printed successfully. What it is I'll show you in a later post ;) This concludes the building series. I hope to post some stuff that I printed over time on here. I'll keep you updated when I can.

Friday, November 8, 2013

Henry RIP!

We just said a last goodbye to our good friend and ex-colleague Henry Verbeek who was taken away at only 41 years of age. Leaving his wife Suzanna Verbeek and 9 year old daughter Fabienne behind. Tough times Henry we miss you already. RIP! And all the strength in the world to family and friends.
 

Tuesday, October 1, 2013

Biz2Be 3D Logo and Under Construction Page

For a friend who is starting a new company I'm currently doing some 3D work. First of all another design company made a new logo for him in 2D. I got the vector file from him and we made some adjustments to the bottom text and then I made this 3D logo for him. I think it turned out quite nice. Then he asked me to make an 'under construction' page for him to put the logo online while he is working on his website. I though let's make something nice. I rigged the little character to take this position and added some nice contruction elements to make a complete 3D scene out of it. You can view the full version by clicking on the picture or visiting his website http://www.biz2be.nl (as long as it is not done yet). I hope you like it. And do contact me if you have a job like this :)

Tuesday, September 17, 2013

Blender on the Render Farm

Even though I'm a very happy Cinema 4D user, the first thing I bumped into when I tried to find customers for the Render Farm is that not everyone is using Cinema 4D of course. There are many 3D design applications out there. One of them is even completely free since it is open source and it is called Blender. You can download it and install it and start working with it right away. I was actually amazed how powerful it is. Anyway: last week I installed Blender on the Render Farm and I did some successful testing with it. So if you use Blender (or C4D) and you have a large animation to render give me a shout and maybe we can work something out. I'm sure I can render it much faster on the render farm than you can do yourself on your own PC. More information on Blender here: http://www.blender.org/

Monday, September 16, 2013

SchallPlatte 15 Released with Synth.nl track Underground

Recently the German Electronic Music club Schallwende released another sampler CD. It is already the 15th edition of the SchallPlatte series. This CD is only distributed to the members of the club and is not for sale. A jury always selects the tracks from a large amount of submissions. This year I decided to send in a track and I'm proud to see that it was selected again. The theme for the CD this year was 'World Cities'. I made a track about my favorite city London in the UK and used some samples that I recorded myself from the London Underground. The track is called 'Underground' as well for this reason. You can listen to the track on my website on this URL http://www.synth.nl/SchallPlatte15. I hope you like it. It will be my only solo release this year I'm afraid. Hopefully I'll have some more time in the future for my solo work again. Well. Enough for now. Enjoy! :)

Thursday, September 5, 2013

Installing C4D R15 on Render Farm

Yesterday I got a nice package in the mail. The new version of Maxon Cinema 4D R15. As you all know I have been busy with 3D animations for a while. This version really looks great again. They even promise render speed increases of up to 300%!! I can't wait for that. Rendering in high quality always takes to long. For that reason I have been building a render farm over the last years that finally is taking shape. I hope to make a commercial service out of this somewhere this year as well. I'm already talking to some potential customers. I will tell you more about the render farm very soon, but if you are interested in a lot of CPU's then don't hesitate to contact me already, since the render farm is already operational. OK back to installing this new version on a lot of servers.

Saturday, August 31, 2013

Velleman K8200 3D Printer (Part 5)

Another very critical and not so easy part of building the K8200 3D printer is assembling the hot end. This is where is plastic eventually will be heated to 190 degrees C with PLA and even higher with ABS. To keep the temperature steady a tiny NTC has to be inserted in a very small whole in the heater. The wires are about as thin as a hair and you have to solder them to the thicker wire, put heat resistant tube around it and make sure none of the leads touch each other and don't touch the copper either.

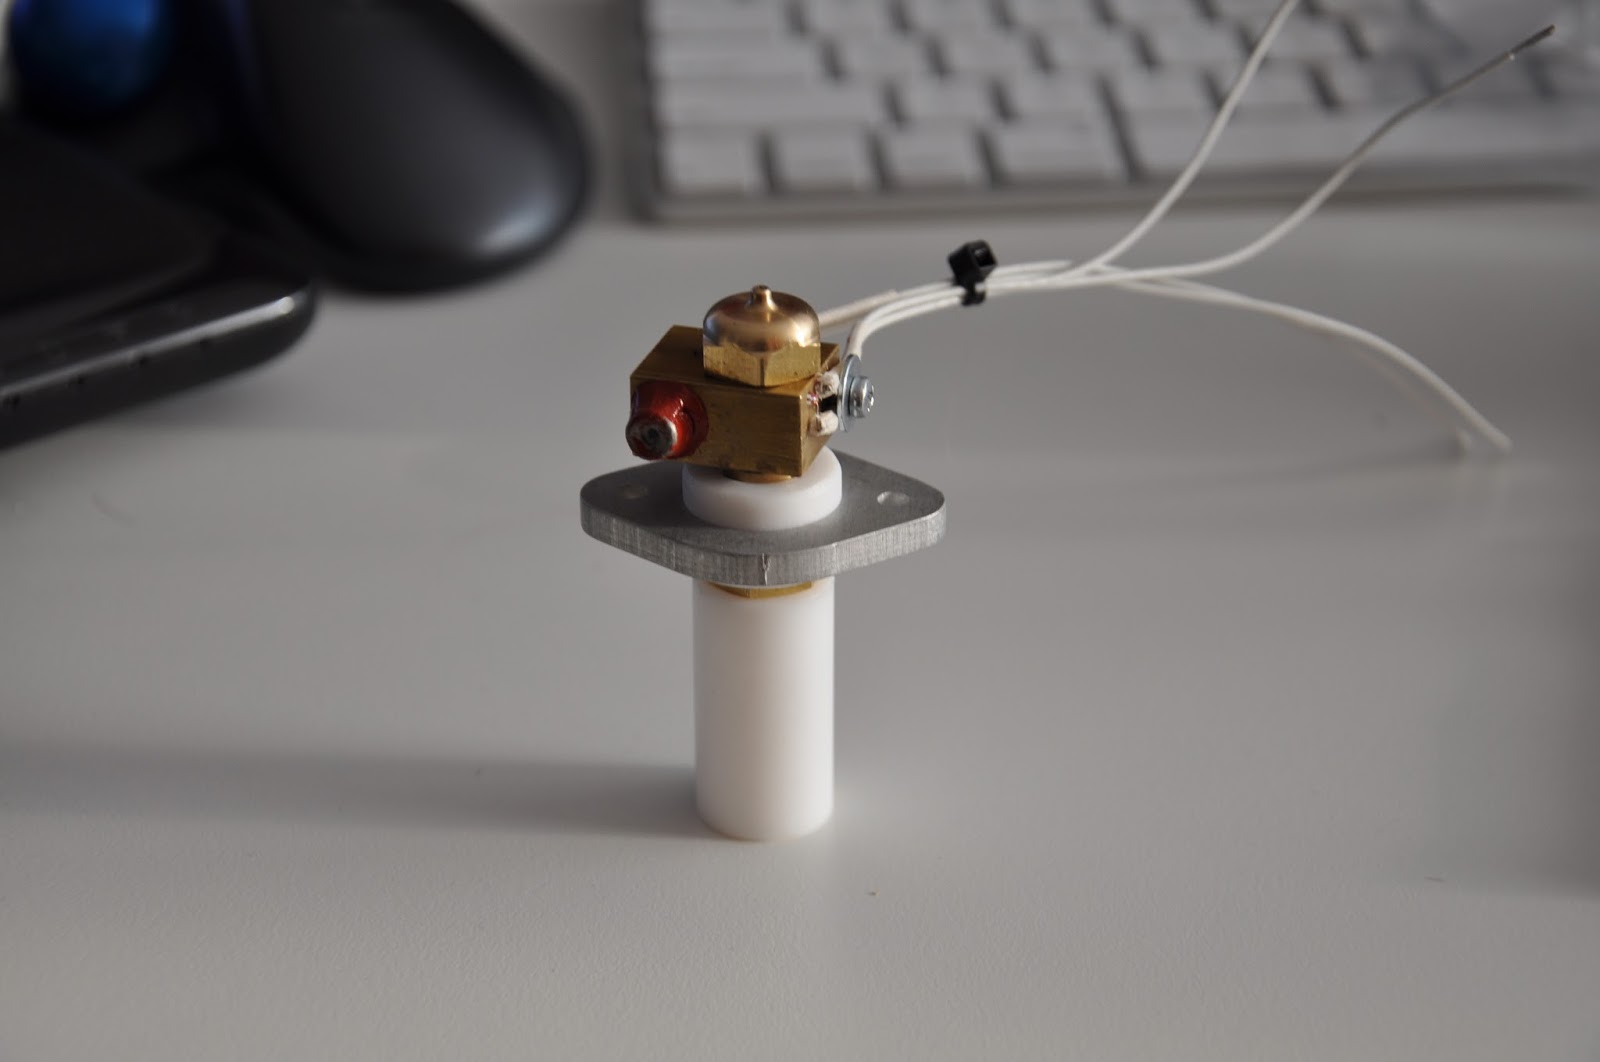
If you make a mistake here or don't insert the NTC resistor properly in the whole your temperatures will be off and your prints will fail. You need a lot of patience here :) On the right is a picture of the whole hot end. It is actually up side down. Eventually the plastic flow from the little hole on top of the copper nozzle. This is the print head and it will be about 0,25 mm from the print bed. Another remark is in the manual that you need to tighten all of this very good to prevent leakage that will be unrepairable and will cost you a new hot end. So again. Patience and check and double check everything.

The it is time to install the control board and solder all the wires. Not a very exiting job but again you need patience and some soldering skills. The manual is quite extensive about which wire goes where and shows a lot of pictures. So if you follow along carefully you can't go wrong there. When you are finished you wrap everything up neatly with some tie raps and you can do some sanity checks with your multimeter to see if there is no short circuits anywhere.

And then you are done building, but not finished by far. The first step is calibrating the stepper motor voltages. You need a multimeter and a very small screw driver for this and again patience :) Then you test the switches with the multimeter and measure the NTC's. And then the famous smoke test. Hook up the power, watch the leds and see if nothing smokes. When that is done it is time for some actual testing from the software and seeing if all the motors run and if the calibration works. So far so good. I'm happy to say that everything was working for me the first time. But the story isn't over yet :) The hardest part turned out still to come. More on that soon.


Tuesday, August 27, 2013

Velleman K8200 3D Printer (Part 4)

Next part to build was the extruder. This is the mechanical part that feeds the filament (plastic material) in to the extruder. It holds one motor and some gears. The tricky part here is to put a spring in that has quite some tension to it. And this also holds the last motor. It is very essential that everything runs smoothly again. The manual also talks about some bolts that need to be 'tight' and some that cannot me 'too tight'.

All very relative right. I thought as longs as it runs it must be OK. Then you have to attach it to the frame. I found out that this is not easy. You have to put some rings in between and they kept falling our every time I tried to screw it on. I think I did this 10 times over. But well. It is on now. This actually concludes most of the mechanical moving parts. Everything still runs fine so I'm quite happy so far.

Then you have to assemble the heated print bed. There are two tricky parts here. First of all you have to solder on a NTC on the backside. Not easy since it is a SMD component and it is very small. Luckily I did this before, but you need some skills and a good soldering iron for this. It is essential that you solder it as flat as possible or you will get into trouble later. Also the screws are actually to large. They stick out of the bed. Try to avoid that since the print head will only be 0.25 from the bed and the screws can be higher. You don't want to hit them since the software doesn't know the screws are there.

Then you finally get to install the mysterious part that you build the first. And suddenly you understand its purpose. It only holds the spool of filament later on. So the detailed description given about the measurements here make no sense at all since all the spools I've see so way are way smaller that this. But a well.. It fits :) I did have one spool laying around and of course it fitted easily. OK so far for the mechanical part. After this it will be electronics and lots of wiring.


Sunday, August 25, 2013

Cloudpage Logo and Mailing List

At the moment I'm working together with my good friend Ringo on a new software product that we plan to release as a private cloud solution for small and medium sized businesses. We think it can improve efficiency for these companies in handling their information and document/files and make working together a lot easier. It will be a new way to work we think. More information will come soon. I Can't tell you more now. It is still early in the process and we still have a lot of work to do. Ringo works hard on the software and my job is the commercial part and there I already made a little start. We thought of the name Cloudpage for the product and Robin from Frontline Studios made this very nice logo for us.

We also registered the domain names cloudpage.com, .eu, .nl etc and I also started building a little website last week in Joomla for it. The most important thing on there right now is our contact information so we can keep you posted on the progress. There is a mailing list where you can subscribe and also a link to the Twitter, Linked-In, Google Plus and Facebook pages that we made for this product. So do subscribe to the mailinglist and connect on your preferred social media site to keep updated. You can always send me an E-mail as well if you want to know a little more already. You can find the website on http://www.cloudpage.com. Thanks for your interest!

Velleman K8200 3D Printer (Part 3)

I didn't have much time lately to continue this report, but now I did so here it continues. Next part in building the printer was constructing the frame. It is made of clever aluminum struts held together by 90 degree angled clamps. I never saw this stuff before, but it is really cool you can build anything with this I guess. Tricky part is you really need to read the manual here since you have to insert some square nuts in there that you will need later.

After that you insert the X/Y carriage that was constructed before. Aligning is a careful job as well. It has to be positioned very well. The cool thing is after this you are able to move it around and get a sense of what it will be like when it is printing. I was quite happy that everything seemed to move very smoothly so I could go on to the next part. Down side is now that it is getting quite a large piece to work on so I had to continue my work on the floor.

Then you start building your way up. These two assemblies on the left and right will eventually move the print extruder assembly up and down. So this is for the Z movement. On the left is another motor with a long piece of threaded material attached the drives an embedded bolt. On top you have to apply quite some force to screw on a lock tight bolt. It is quite difficult to hold it all. You have to be especially careful not the damage the thread since it will make smooth movement problematic later on.

And the last part is to install another piece of aluminum strut on top to hold everything together. I didn't follow the manual here on purpose. The bar is supposed to go lower with a bracket on top, but I thought it didn't look as nice and I preferred to mount it like this. I could not think of any problem this would create since the whole construction was still rock solid. And it really necessary I could always change this later on. So far so good. Everything still running smoothly also by turning the motor for the Z movement. It is really starting to look like a real machine already :)

Sunday, August 11, 2013

Velleman K8200 3D Printer (Part 2)

And here is the correct tool. Life if so easy when you have the right equipment. With this tool snapping the O-rings in place was a matter of seconds work. So do your self a favor and get one of these. Velleman is quite clear by the way in the manual as well about the tools you need, so go check this before you start your build and get frustrated. OK enough about the tools lets continue with the build.

After the this you need to construct the other carriage and these two go together with some rods. It is very important that you get this very straight for a smooth movement later on. So you are advised to tighten all the screws while moving the carriage so that it aligns during screwing. Don't apply too much force since it will twist the part then. I found also that adding a little teflon spray helped to make thing evens more smooth.

After this you have to install the first motor. In total there will be 4 motors in the whole printer. One for the X, Y and Z movement and one for the extruder later on. The most difficult part in this step is cutting the timing belt. You have to count an exact number of tooth and not more one or less. If you screw up here you can order a spare part :) I think I recounted about 5 times  before I finally cut it and still wasn't sure :)

Here is the complete X/Y carriage including the motor and the belt. Eventually the heated print bed will be attached on top of this whole construction. Well so far I am happy with the result. I'm not that skillful in mechanics but it all runs very smoothly. Before I called it a day I did read the rest of the manual to estimate how far I could get the next day. But I was pretty sure it was going to take at least 3 days to build this thing. So far for day 1. To be continued..

Velleman K8200 3D Printer (Part 1)

Another thing that has been on my mind for a long time was building my own 3D printer. I had been looking on the internet for several projects, but none of them were very clear. I found some kits, but they were a bit expensive, then just a week before my holiday I visited my local electronics store to pick something up and there was this 3D printer kit from Velleman on the counter. Complete and ready to take and for a price I thought was really interesting so I couldn't resist it and took it home including some PLA print material. The kit is called the K8200 and I started building it right away. I took picture along the way so I thought it would be nice to share this experience with you as well on my blog.

Here is the content of the box. A lot of small bags with parts, some metal parts and some electronics. I was expecting a bit manual, but I couldn't find it at first, but when I read the documentation that came along they pointed to a website. On there is the real build manual and it is rather extensive. A lot of detailed pictures. For the first step I made the mistake to print the pdf, but that were way too many pages, so I continued the build next to my PC to read a long on the screen.

The first part to build is rather simple. It is just a rod with some nuts and rings on it. At first I didn't understand what it was supposed to do, but later on in the build project I found out that this is the spool holder. The plastic material is delivered on spools as you can see in the very first picture and this thing sticks on top of the printer later to feed the material into the printer and make the spool rol turn on its own axis. Nothing fancy but still an important piece :)

The next part to build is the carriage that will hold the print bed later on. I immediately ran into trouble there. On top in the picture you see some ball bearings and below that some O-rings. You have to put these rings around the ball bearings and slide them into the black plastic parts. You need a special tool for these o-rings and I didn't have it. So I tried to get them on using other tools, but that is really impossible. Then my wife was smart enough to see this and ask me what I was doing. I said I didn't have the right tool and that it was Friday evening and the shops were closed. Luckily my wife is better into shopping as I am and told me the hardware store was open all evening :) Oh. I just spend 1 hour for nothing. I short trip to the hardware store and 15 euros further I had the right tool. To be continued in part 2.....

Saturday, August 10, 2013

Oculus Rift: My first steps into Virtual Reality

As you all know by now I'm into 3D stuff as well next to my music. One of the things that always fascinated me was Virtual Reality. Long time ago I did try one of those VR goggles, but was not impressed by the quality and also a lot of lag on the head movement made me dizzy. Besides that they were ridiculously expensive. Then I read about a project on KickStarter that would solve all this. It look so promising that I decided to join the crowd funding of this project. And last week it arrived, so I couldn't wait to have a go.

What you get is this nice box. It is not the final product yet, but a developers version. It is intended for people to develop games for the Oculus Rift. And yes you guessed right that is the name of this product. In the box are some different lenses so that you can adjust it to your eyes depending on whether you wear glasses or not. Then there are the Goggles and a control box. Installing is simple. You put a HDMI cable from you PC's video card in the box and a USB connection from the box in your PC. Then you install the software and you are good to go. At least. You still have to tell your video card that you have an extra monitor.

Then you start the calibration software. You have to close one eye at a time. Adjust some green lines and then you can test your settings. You are put in a room and you can look around. I was already SO impressed by this. But then I downloaded some demos from the Internet and it got better and better. The head tracking is so superb that it feels SO real. Amazing. And usually I get a head ache instantly from 3D glasses on these new 3D TV's, but not here. It is way better and you can look up, down, behind you. In the end I found some games and I'm totally hooked now :) I can really recommend this. Even though the resolution isn't even that high. 1280x800 divided over your two eyes (so 640x800) each, minus some adjustment I guess. So yes you can see pixels, but once you are moving around or looking around you don't see them any more. Your brain really let's you think you are in another (virtual) reality. More information and pre-orders from here: http://www.oculusvr.com/. I'm sure this will be the future of gaming! Highly recommended.